Sefram 7835 - Test report
How useful can a 20-year-old TV/CATV/SAT field meter
be nowadays? I tested my latest eBay purchase for my field meter collection…

The Sefram 7835 showing the boot screen with
licensed options – this model has everything activated, except the GPS options,
which was reserved for the Sefram 2028 model.
I recently came across
two eBay listings from the same seller, with two used Sefram 7835 field meter.They were listed “as is” and described as coming without charger and having dead
batteries.
Still, the pictures showed the devices alive, so I made an offer and ended up buying both.
After a week or so,
the package arrived and included just the two devices, one inside a soft bag.
Both devices wouldn’t
turn on, but that was expected, as the seller stated dead batteries on both. So,
I hooked up a PSU (interestingly of the much newer OEM model Spaun Sparos 609 I
own) and to my satisfaction, both devices switched on.

The two Sefram 7835 meters after cleaning.
Immediately I tested
all functions (DVB-S/T/C, analogue TV and FM radio), Spectrum, Demodulator,
Measurements and Constellation Diagram. All worked fine on both devices.
Once thing I noticed
was that one device had FW4.1, while the other was running on FW2.4. Unfortunately,
I did not find any FW upgrade online, not even using www.archive.org. I was close to giving up, when it occurred to
me to just ask Sefram! I sent an email to Sefram technical support on a
Saturday and believe it or not, on Monday morning I got a reply with a link to
download the FW4.1 installer and, as an attachment, I received the English User
Manual, as well! This speaks a lot in favour of Sefram. I can only stress out
how important customer service is – not just for devices under warranty, but
even after it expired.
Next, I noticed that
one device would not keep the date, time and selected language. I figured that
there must be a dead battery inside the device and after opening it up, I found
the culprit right away: a dead DL2450 cell. Since I did not have a spare one
around, I just fitted a CR2032. Both are 3V, the CR2032 just has less capacity
and will need to be replaced sooner.
 ´
´
The DL2450 battery – easy to see, but not that
easy to replace, as it requires disassembly of the complete device. Sefram has
probably not thought that this device would last over 20 years!
Next step was to clean
both devices and remove all stickers glued by previous owners, namely company
inventory stickers and Sefram reseller sticker. I noticed a sliding door on the
front side, which eventually revealed the battery.

A sliding door reveals the DR35 type NiMH
battery.
To my surprise it is a
common DR35 type battery, shared by many laptops of 2000-2005 and based on NiMH
batteries. This is a good thing, because the DR35 batteries are still being
sold! So, I ordered one for about 60 Euro. This is relatively cheap compared to
the normal price asked for field meter replacement batteries, which normally
cost over 200 Euro.

The DR35 battery is a common battery type, that
can still be bought as a new battery. In fact, the relevant sellers restore
existing batteries by replacing the NiMH cells with new ones.
Two days later, after
some further testing and handling, I noticed that the devices would work a
while on their batteries! So, I left both devices charging overnight. The next morning,
I switched them on and left them running. They would work for more than half an
hour, which is amazing, considering the age of the batteries.
By this time, I had
not received the new battery, yet, but I had done some charge/discharge cycles.
While I was beginning to wonder if it was a mistake to order the new battery
(the existing ones were good enough for me), one of both devices started to
behave erratically, turning on by itself and then struggling to keep switched
on.
After a while I
couldn’t switch the device on at all. Could it be dead? After charging it a
while it would switch on and off by itself again. From there, it would then work
normally for a while.
After disassembling
the whole device, I noticed that the power circuit had some encrusted electrolyte
that leaked from a capacitor to a MOSFET responsible for the ON/OFF switching!
After scratching that electrolyte off the contacts of the MOSFET, the problem
was gone. I know that the capacitor is on the TODO list to be replaced, but for
now I am just happy for the device to work fine.

This MOSFET was surrounded by encrusted
electrolyte coming from the neighbouring capacitor.
During this
intervention, I noticed that the same power circuit had been already repaired
on the other device. A capacitor had been replaced and the whole MOSFET
replaced by a different one, mounted at 180 degrees rotation glued on the PCB
with wires soldered directly to the three legs. I guess that this device had
suffered from similar capacitor leakage in the past, ruining some traces. At
least I wouldn’t expect this to be the standard factory build.

The picture shows the same part of the main
PCB, responsible for the power supply. Notice that the left side shows that one
of the meters has already been repaired!
Conclusion: If you
purchase a Sefram 7835 yourself or already own one, make sure to look at the
power management circuit to prevent any future damage!
Anyway, this minor
repair gave me an insight of the architecture of the Sefram 7835. The main
board has the option boards soldered vertically on the bottom part. Several
wires and two flat cables connect to the upper cover, where the keyboard,
encoder and TFT screen reside. If you want to disassemble a Sefram 7835, you
just need to unscrew two front screws, but then lift the upper cover carefully
due to these cables. Interestingly, a MIPS based module is piggy backed on the
TFT module. It is probably an OEM board of some satellite receiver, running
with a modified firmware and used to do the MPEG2 decoding.
Another interesting
finding is the fact that this field meter uses four tuners: two for the SAT
band and two for TV/CATV/FM bands. I can only guess, but I believe that this
allows to demodulate the signal, while simultaneously show measurements.
Overall, I think that
the hardware architecture could have been improved in terms of accessibility
and reparability. I dislike the fact that the option boards are directly
soldered on the main board, making it very difficult to access them – they
would need to be de-soldered.

The inside of the Sefram 7835: all option
boards are vertically soldered to the main board.
Having a connector
would have added little to the manufacturing cost. But compared to other field
meters of the area, I must confess that this device is one of the best I have
ever seen. Take for instance the Emitor Satlook Digital NIT of about the same
period. The boards are much harder to access, and every wire and cable is
soldered, making it an ugly mess when it comes to disassembly for cleaning and
repair.
The Sefram 7835 is a
relatively small device and not too heavy. It is perfectly reasonable to hold
it in one hand. While the screen seems a bit small for current technology, it
is still totally usable and bigger than the KWS Electronics Sparos 307 of the
same period. For comparison: the Sefram 7835 is less than half the size, half
the weight and has a bigger screen!

The Sefram 7835 has composite Video and AUDIO
connectors. This can be used for signal IN/OUT (according to licensed options).
Also, you can communicate with the device through the RS232 interface.
The soft bag is
functional and the one that came with one of the two device is in a rather good
shape, considering the age and use it has had. Only one corner needed some
stitching to be fully recovered. Note that the Sefram 7835 is a bit smaller
than later models from the 786x series, so the soft bags of these won’t fit,
despite the similar shape.

The soft bag can be opened in a way that side
panels offer shade against the sun for out-door use. After 20 years, the soft
bag still works fine.
Focussing on the usage
of the Sefram 7835, I have to say that this meter is fantastic, especially
considering the price I paid, not for one, but for two units!
Even the other offers
I found on eBay and similar platforms, suggest a price between 250 and 350 Euro
for working second-hand models.
For this price, the
functionality is amazing, with only one (expected) problem – the lack of a
DVB-S2 demodulator and anMPEG4 decoder. Would the Sefram 7835 offer these two
features, it would have sold second hand for 1.000-2.000 Euro, easily. Of
course, DVB-S2 and MPEG4 are missing because these standards did not exist back
in 2002-2006, when these meters were sold.
So, what makes me
so impressed about the Sefram 7835?
Here is the feature
list:
- Support for DVB-S/T/C, analogue TV and FM radio
- MPEG2 demodulator
- Analog TV demodulator
- FM radio demodulator
- C/N, MER, BER measurements
- Constellation Diagram for DVB-S/C/T
- Echo measurement for DVB-T
- Full spectrum analyser which allows setting full continuous span from 45MHz to 2450MHz! It can be used in different modes and allows to set the RBW filter to 30kHz, 100KHz, 300KHz and 1MHz. Further features include MAX and AVG render and measurements. Finally, marker options, common to pure spectrum analysers, are available, for example marker to centre frequency
- Full support for DiSEqC-1.0 and DiSEqC-1.2 positioner
- Analog TV demodulation has a built-in oscilloscope function to render the scan lines
But it is not just the
functionality that impresses. The GUI is great: simple, quick and effective.
Another important
fact: press the power button and the Sefram 7835 is ready to use in 2-3
seconds! Yes, that is seconds. By switching on so fast, you can get effectively
much more from the battery reserve, since you will switch the meter on/off
according to your needs. Other, more recent field meter boot like a computer
and as a result, you will keep them switched on, even while doing something
else like fastening the antenna or preparing an outlet.
The way you work with
this field meter is to first setup channel plans (you have a limited amount,
but you can select between more playlists with less transponder configurations
or less playlist with more transponder configurations.
Then you can edit for
each playlist, what tuner to use (terrestrial or satellite).

Channel list for satellite transponders.
Finally, you can
decide if you want to fill the playlist with pre-programmed transponders, which
makes most sense for terrestrial bands. Here you can select between the
normalized channel lists for different regions like Europe, Europe Cable, etc.

Channel list for TV and CATV channels.
You can edit each
entry and make changes, delete the entry or manually create a new entry.
What you cannot do is
mix satellite transponders and terrestrial/cable transponders in one channel
plan. This is possible for instance on Rover Instruments meters and can be
useful for automated measurements. In this case a Rover meter would instruct
the user to attach the correct input cable while carrying out the automated
measurement.
Because editing of
these channel plans is straight forward, it is very quick to setup your
preferred plans on the device itself, while many competing devices really
require some PC based editor. Such an editor does exist for the Sefram 7835 –
it’s the TR7836 software. But because it was a cost-option, I did not find the
software on the internet. It seems that this software is lost forever…
After finishing the
editing of the channel plans, you can easily select a relevant plan for your
measurement. Switch to measurement and you get signal level measurement. This is
shown in real-time, and you can edit/switch the selected transponder/channel.

Signal level measurement. This is great for initial
setup of the antenna.
To measure digital
signals, you can switch to MER/BER measurements.

MER/BER measurements, in this case of a DVB-T
transponder.
Additional information
about the modulation can be shown:

Extra information about the employed modulation
can be visualized.
The spectrum
functionality has straight away some great functionalities: you can render the
spectrum in a filled mode with higher sweep speed and less accuracy. This
renders what is commonly (but erroneously) called a real time spectrum. It
really means that the refresh rate is under a second. The importance is high,
when you are tuning a satellite dish or an antenna, as you can immediately see
what is happening on the spectrum.

Fast spectrum mode, ideal for antenna setup.
Advanced users will
for example recognise a satellite by its distinctive spectrum and hence quickly
manage to point the dish to the desired satellite.
But the Sefram 7835
offers a more precise spectrum analyser mode. Here the trace is drawn as a
simple line, like any regular spectrum analyser. It allows to somehow render
the spectrum with more detail.

Standard spectrum mode: more precise, albeit a
bit slower due to smaller RBW.
Further options
include selection of the RBW filter, as already mentioned, as well as marker
options (called cursor options on this device) and measurements: you can
directly measure the level, delta, power and C/N.

Channel power measurement: the measurement
determines the channel bandwidth and channel power automatically. In this case
7.8MHz and 60.5dByV.
Finally, a dedicated
menu entry for level allows to set the reference level, attenuation and dB/div
settings.
For a field meter this
is a complete spectrum analyser functionality, surpassing for example the
spectrum functionality of field meters like the Televés FSM 500, KWS Sparos 307
or the Kathrein MSK33 of the same time period. If you want a field meter with a
proper spectrum analyser for little money, consider getting a Sefram 7835.
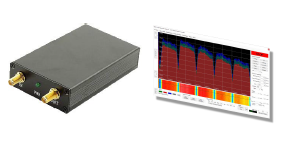
And then there is a
rather unique functionality: you can render the whole supported bandwidth of 45
MHz up to 2160 MHz! Most field meters will either render the terrestrial band
(45 MHz – 850 MHz) or the satellite band (950 MHz – 2150 MHz).

The Sefram 7835 can render the whole supported
spectrum from 45MHz up to 2150MHz!
As I suspected that
this is achieved by switching tuners, I run some tests and confirmed my
suspicion: at exactly 860MHz, the sweep will switch tuners, causing a jump of
about 3 dB on the spectrum for the 860MHz – 2150MHz range, compared to the
noise level from 45 MHz – 860MHz.

When the spectrum sweep switches tuner, a 3dByV
mismatch is visible.
This happens on both meters.
Believe it or not, but
this fine field meter offers a constellation diagram for QPSK, QAM and COFDM.

Excellent constellation diagram rendering: fast
and functional.
The QAM constellation
supports up to 256QAM, so it will be useful for any cable signal you may find.
Press the
constellation key a second time for COFDM signals and you can switch to a
confidence measurement. This is sometimes called “MER vs Carrier” and shows the
individual MER of each carrier of the locked DVB-T transponder.

Confidence
Measurement: it shows the MER of each individual carrier of a DVB-T
transponder.
By pressing the key a third time, you get the
Impulse Response measurement, nowadays normally designated as Echo Measurement.
This measurement shows the interference of secondary emitters in case of single
frequency networks. Imagine you are at 10 km distance from your nearest DVB-T
emitter, but a second DVB-T emitter at 15 km distance is causing interference
due to the delay of its signal. By using two antennas and mixing their signals
by means of cables with calculated length, this problem can be corrected.

Echo Measurement: In my location there is no
interference of a second DVB-T transmitter!
It is nice to see this
measurement in a rather old device!
Moving on to DVB-S
measurements, you just need to select a SAT based channel plan and can for
instance start with signal level measurement. On this screen it is possible to
switch the power for the LNB on, as well as manually change whatever reception frequency,
band or polarisation you want to change.
The signal level is shown in real-time, allowing a precise alignment of the satellite dish. Additionally, the LNB voltage and current is measured – this is not common on satellite field meters and yet it is very useful to determine if the LNB is working fine.

Signal level measurement of a DVB-S transponder,
showing the LNB voltage and current.
Clicking the MER/BER
button will show CBER/VBER (Bit Error Rate before Error Correction and Bit
Error Rate after Viterbi Correction, respectively). Again, this field meter
surprises for allowing to set the measurement type and measurement time. BER
measurements happen over a period and the longer the set interval, the more
errors you will measure.

BER/MER measurement screen.
If you click the
measurement or MER/BER button a second time, you get into a long-term
measurement mode. A graph will show the relevant measurements over a selectable
period (10min up to 7 days). This is a great function to show for example your
bad weather reserve for satellite reception. Leave it running for one hour and
you can see how the reception parameters vary with rain and wind. The
simplicity of this function is what made me like and use it right away. The
same function is available for signal level and C/N measurement: just press the
relevant button a second time.

Long term measurement of CBR, MER, BER and UNC
of a satellite transponder. This is great to understand if there is enough bad
weather reserve.
And of course, you get
the Constellation Diagram for QPSK, too. But once again, the Sefram 7835
outperforms much of the competition of its time by simultaneously showing
BER/MER!

Constellation Diagram for SAT mode.
The TV button will
allow the demodulation of any of the supported modulations, including analogue
and digital signals, the latter encoded in MPEG2.

MPEG3 demodulation.
Unfortunately, in 2022
there are less and less DVB-S transponders on Ku-band satellites and most
providers already switched to MPEG4. With DVB-T, most operators have changed to
MPEG4, too. But DVB-C is still widely used with MPEG2 encoded services.
Coincidentally, the image shows a banner referring to the switch-off of
transponder 10744MHz H-L on Astra 19.2E…

Measurements can be rendered on screen during
MPEG2 demodulation and DiSEqC commands can be issued, including the movement of
DiSEqC-1.2 motors.
A very nice feature is
the fact that you can rotate the dish, while in TV mode. The CBER measurement
will show the current Bit Error Rate before Error Correction, allowing to perfectly
fine tune of the dish.

Support for DiSEqC-1.2 motorised dishes.
The same menu is
available in Spectrum mode, where it makes more sense for digital satellite
transponders.
And then there is the
analogue CATV. Modern Triple Play Service providers will offer their service
through fibre and a special router will separate the internet, telephone and TV
signals, feeding analogue CATV transponders and DVB-T or DVB-C digital TV
transponders into the home TV distribution.

Of course, it is possible to render analogue
channels (and FM radio), too!
With the Sefram 7835
you will be prepared to measure your signals and solve many problems.
And don’t get me
wrong: even for satellite TV this meter is still very useful, thanks to the
fabulous spectrum functionality and the fact that it supports the control of
motorized systems while rendering the real-time spectrum.
Oh, I forgot to
mention that the TV mode for analogue channels offers an oscilloscope mode to
visualize the scanline data. This is helpful to analyse the sync signals of the
analogue TV video. For the hobbyist it is a nice tool to visualize ancient
encryption methods like Videocrypt or Nagravision (the analogue implementation
used in Germany), as well as, to understand the Macrovision copy protection
that rendered it impossible to record video to VCR (this could be circumvented
by the so called “video enhancers”).

Sync information can be shown in a small window
overlaid to the demodulated picture.
Or the whole scanline
can be rendered:

Alternative, the whole scanline can be shown
and it is possible to select the desired scanline.
A final note about the
Sefram 783X product line: there were three models, the 7833 (terrestrial only),
the 7834 (satellite only) and the 7835 (both terrestrial and satellite).
Furthermore, there was
a 2029 model, which included a GPS option and was marked for mapping DVB-T
reception – this back in 2002-2006! I was not even aware that such
functionality was even available back then.
Regarding the 7835,
there are two models: the first model with serial number under 1.000 and a
newer model with serial number greater than 1.000. From my understanding, the
only difference, apart from both models using different FW releases (the latter
has the latest FW 4.1N, while the older model has FW 4.1 – notice the “N”
marking the difference), is that the newer model has a revised MPEG2 module
offering NIT and PID information. Also, it seems that the SeframSat v3.2 PC
software will allow editing the channel plans with this newer 7835 version.
There is a way to
immediately distinguish the older device model from the newer “N” model: the
new model has a key labelled DiSEqC, while the old model features this key
labelled with a printer icon. This allows you to easily identify the model
based on the pictures of offerings at eBay or similar platforms.

Keyboard of the older 7835 version with S/N
under 1000
And now for something
completely different: I recently came across the “German Tank Problem” (read
about it here: https://en.wikipedia.org/wiki/German_tank_problem). It deals with the Allies trying to figure
out the number of German tanks by looking at the serial numbers of the captured
tanks and thus extrapolating the number of tanks. Since I own two Sefram 7835
meters and found some pictures online, I used the successful formula:
N = m + m / k -1
Where N is the
predicted total number, m the highest observed serial number and k the number
of devices found.
This gives me an
estimate of 446 produced units.
We know that the older
model can have a maximum serial number of 999, but I doubt they produced that
many. I think there are about 400-500 Sefram 7835 devices and an unknown number
of Sefram 7835N models.
Of course, only Sefram can confirm these numbers…
Conclusion:
I am amazed how
evolved the Sefram 7835 is for a device manufactured and launched in 2002.
Competing devices from this era are almost all worse in any aspect – I am
talking about any field meter with a CRT screen and even those with TFT screens
like the Promax TV Explorer/Prodig 5, Televés FSM 400/450/500, KWS Sparos 307
or the boat anchor Kathrein MSK33 have little to offer against this device.
The only functionality
that is missing is an automatic scan feature that determines i.e., the symbol rate.
Here, to my knowledge only the Emitor Satlook Digital NIT and later models like
the Satlook Digital Color can do this.
If you are looking for
a bargain TV/CATV/SAT field meter for your DX hobby, these devices can be found
at as little as 200-400 Euro on eBay, when available.
My respect for Sefram increased considerably with the Sefram 7835. It made me even more fond of my Spaun Sparos 609 (a Sefram 786x OEM) and my Spaun Sparos 711 (a Sefram 787x OEM)!
The original french product sheet can be downloaded here (external link):
https://usermanual.wiki/Bk/7835Datasheet.148404049/view
|
About me
In the past I have
collaborated with TELE-satellite/TELE-audiovision. While this magazine is no
longer published, most edition can be accessed for free here: http://www.tele-audiovision.com/eng/ Other works in this area
include the development of user manuals for field meter, translation of
manuals and firmware, as well as, producing in-depth test reports. My lab includes MPEG2/4
encoders, multiplexer, IRD, DVB-S/S2/C/C2/T/T2 modulators, several antennas,
spectrum analysers, signal generators, etc. Feel free to contact me
regrading a possible collaboration: vma@norcam.pt |


Really interesting blog article, thanks;)
ReplyDelete